Home » Using Zoho Mail as an SMTP Server for Cold Emailing: A Unique Strategy for High Deliverability Rates
Cold emailing can be a challenging task, especially if you’re trying to send out a massive number of emails without being flagged as spam. This is where using a dedicated SMTP server can help. In this tutorial article, we’ll show you how to use Zoho Mail as an SMTP server for cold emailing using a unique strategy that involves warming up multiple domains to ensure high deliverability rates. We’ll guide you through the process of purchasing domains on Google Domains, connecting them to Zoho Mail, warming up each mailbox with SalesHandy, and finally, connecting them to Google Workspace for bulk mailing. By following these steps, you’ll be able to send out a large number of emails without being flagged as spam and increase your chances of reaching your target audience.
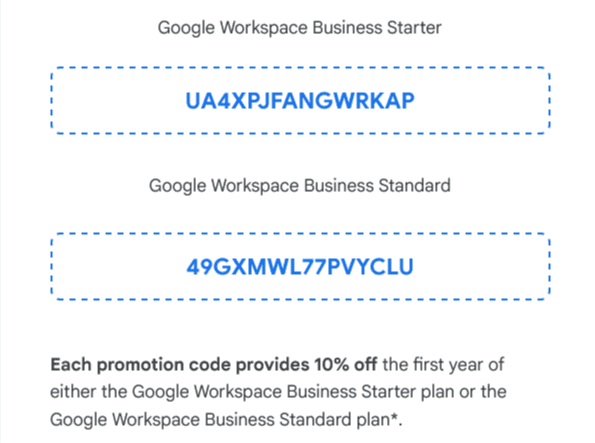
(P.s. Scroll down to copy the 10% off code for Google Workspace)
There are many variables involved in constructing a successful cold email system. Your cold emails should be the result of a highly efficient, well-coordinated operation where several tools seamlessly integrate. In this strategy, we will utilize the following tools:
– Choose the extension (.com, .org, .net, etc.) and add to cart
– Follow the steps to complete the purchase and set up your Google Domains account
2. Connect the domains to Zoho Mail:
Once you’ve purchased the domains, you can connect them to Zoho Mail by following these steps:
– Sign up for a Zoho Mail account and choose the option to add a new domain
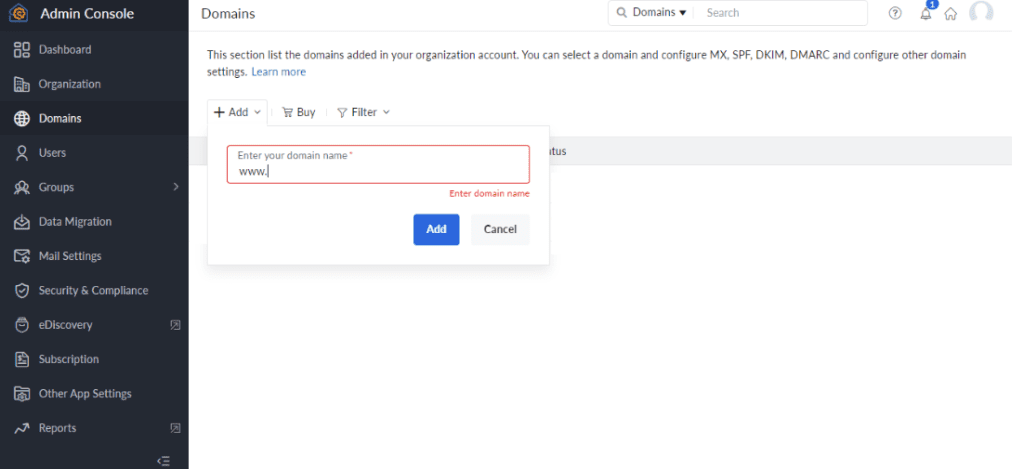
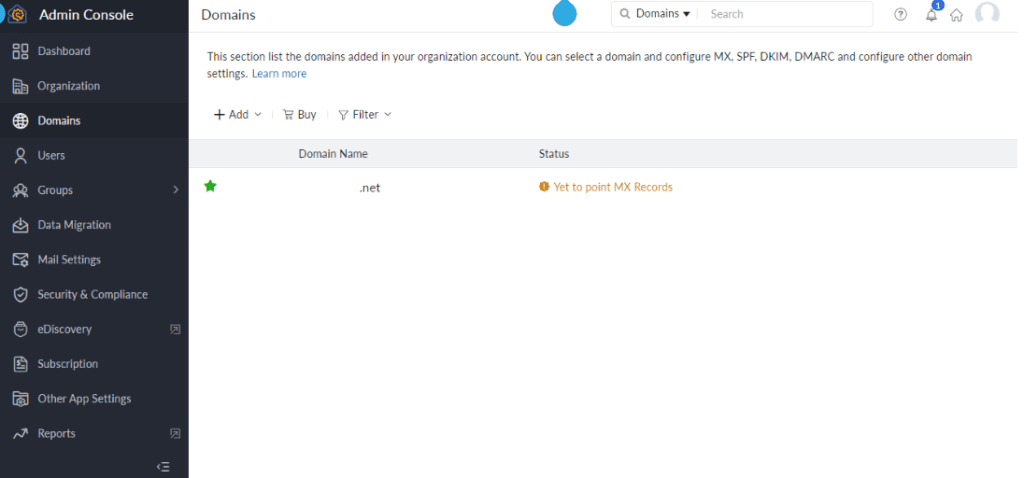
– Enter the domain name you purchased on Google Domains and follow the steps to verify ownership
– Once ownership is verified, you can create mailboxes for each domain by going to the “User Details” tab and adding new users
– Follow the steps to set up each mailbox and remember to take note of the SMTP server details for each domain
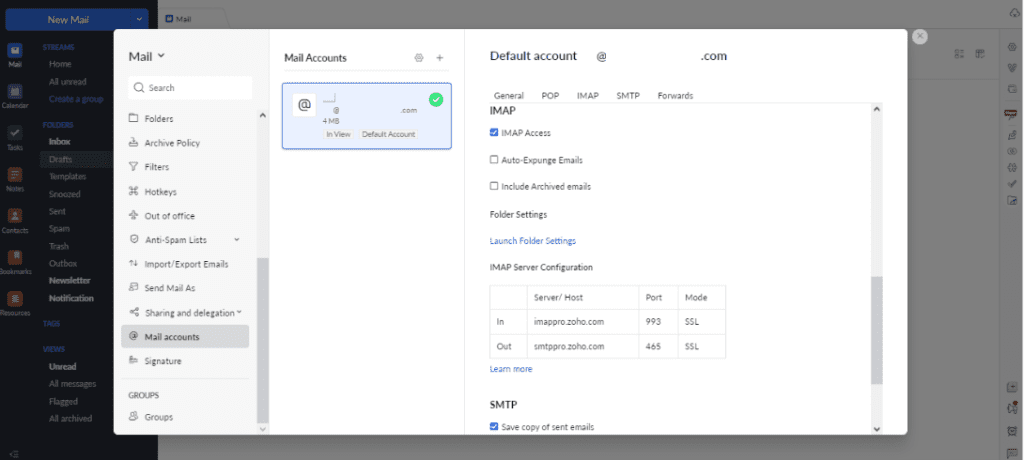
2.Click on the settings button
Navigate to “Mail Accounts”. Under mail accounts, check “IMAP” access and “Save copy of sent emails”.
Once the domain is added, click on the domain name.
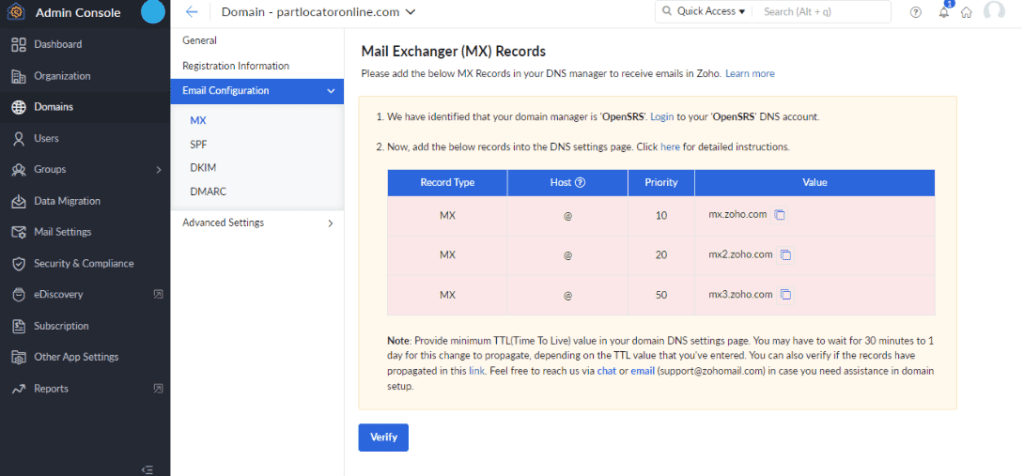
On the email configuration option, update all steps (MX, SPF, DKIM and DMARC). Processes to verify configurations will be shown on the page step-by-step. Configurations differ on the domain manager used.
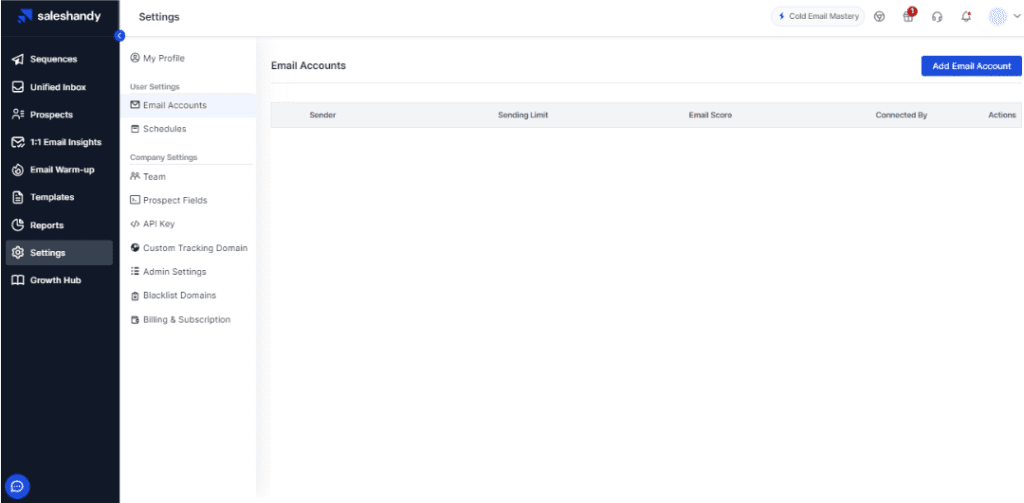
3. Connect each Zoho mailbox SMTP to SalesHandy
To connect each Zoho mailbox to SalesHandy for warming up, follow these steps:
– Go to the “SMTP” section under “Settings” and click on “Add SMTP”
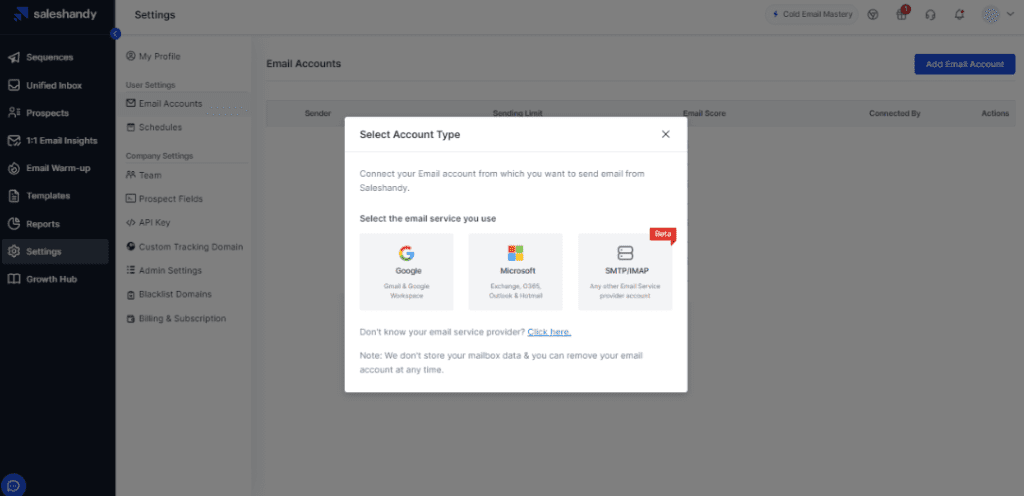
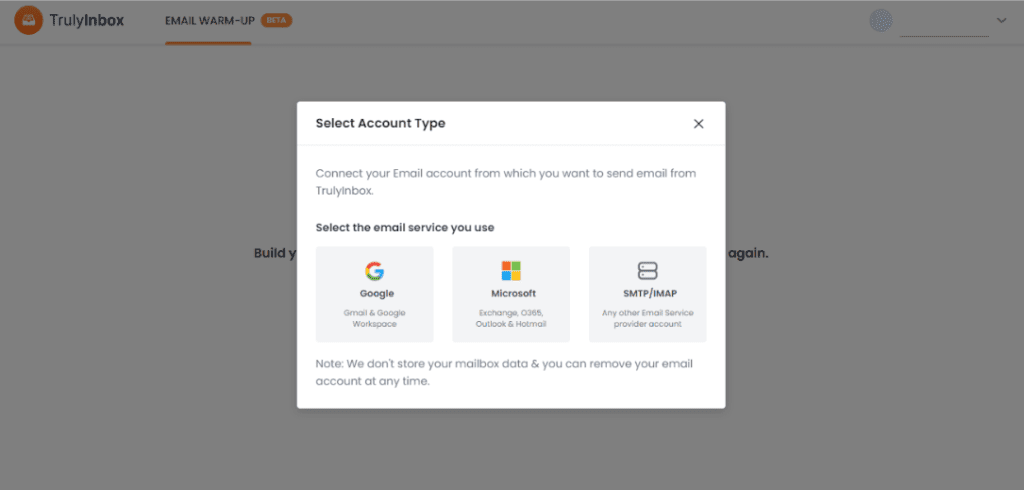
Once the pop-up shows, select the “SMTP/IMAP” option.
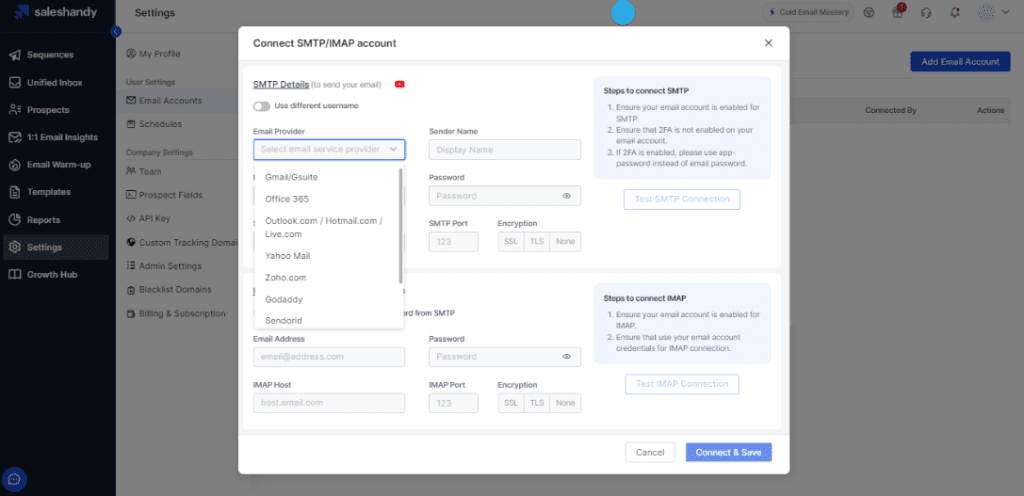
Select “Zoho.com” as the Email Provider. Add other details to the form then test the connection. Once the connection is successful, click “Connect & Save”.
4. Using TrulyInbox (with Saleshandy) to Warm Up the Zoho Mails
Saleshandy has partnered with TrulyInbox, a third-party warm-up tool, to provide with the best possible warm-up experience, exclusively to Saleshandy users at no extra cost.
All version 3 users can continue to use warm-up with TrulyInbox. Additionally, you can expect to see even more advanced capabilities and improvements in the future. TrulyInbox supports all major ESPs, including Google, Zoho, Microsoft, Yahoo, and more.
Login to TrulyInbox. Click “Add Email Account”. Once the pop-up shows, select the “SMTP/IMAP” option.
Select “Zoho.com” as the Email Provider. Add other details to the form then test the connection. Once the connection is successful, click “Connect & Save”.
Once you have connected your email accounts to your SMTP server, you can start warming up your inboxes by gradually increasing the volume of emails you send each day. Start by sending a small number of emails, such as 10-20, to a list of known recipients or to your own email address. This will help establish a positive sender reputation with the email provider and improve your email deliverability rates. Over time, gradually increase the volume of emails you send each day until you reach your desired volume. It’s important to maintain a consistent sending volume and avoid sudden spikes in your email sending activity as this can negatively impact your sender reputation and increase the likelihood of being flagged as spam. Also, make sure to use engaging and relevant email content to encourage recipients to engage with your emails and avoid marking them as spam.
5. After warmup: Disconnect the domains from Zoho and connect them to Google Workspace
To disconnect the domains from Zoho and connect them to Google Workspace for bulk mailing, follow these steps:
– Sign up for a Google Workspace account and follow the steps to set up your account.
If you want to get 10% off, you can use these codes:
– Go to the “Domains” section under “Settings” and click on “Add a Domain”
– Enter the domain name you purchased on Google Domains and follow the steps to verify ownership
– Once ownership is verified, you can create mailboxes for each domain by going to the “Users” section and adding new users
– Follow the steps to set up each mailbox and remember to take note of the SMTP server details for each domain
6. Connect the domains to SalesHandy for bulk mailing
To connect the domains to SalesHandy for bulk mailing, follow these steps:
– Go to the “SMTP” section under “Settings” and click on “Add SMTP”
– Enter the SMTP server details for the first Google Workspace mailbox and follow the steps to authenticate and test the connection
– Repeat the process for each Google Workspace mailbox until all are connected to SalesHandy
– You can now use SalesHandy for bulk mailing using the warmed-up domains from Google Workspace
7. Verify your lists BEFORE you activate any campaign!
After investing substantial effort into your campaigns, it’s crucial not to jeopardize your domain’s reputation! High bounce rates can inflict severe damage on this valuable asset. It’s worth noting that these bounce rates are typically a consequence of unclean, unverified email lists 99% of the time. Avoid unnecessary risks in this area. By employing Zerobounce to verify your lists, you can not only safeguard your domain’s reputation but also significantly boost the effectiveness of your cold email system.
Play Online Casino For Real Money United Kingdom After all, play online casino for real money united kingdom you should consider playing at this casino.
Play Online Casino For Real Money United Kingdom After all, play online casino for real money united kingdom you should consider playing at this casino.
We use cookies on our website to give you the most relevant experience by remembering your preferences and repeat visits. By clicking “Accept”, you consent to the use of ALL the cookies.
This website uses cookies to improve your experience while you navigate through the website. Out of these, the cookies that are categorized as necessary are stored on your browser as they are essential for the working of basic functionalities of the website. We also use third-party cookies that help us analyze and understand how you use this website. These cookies will be stored in your browser only with your consent. You also have the option to opt-out of these cookies. But opting out of some of these cookies may affect your browsing experience.
Necessary cookies are absolutely essential for the website to function properly. These cookies ensure basic functionalities and security features of the website, anonymously.
Cookie
Duration
Description
cookielawinfo-checkbox-analytics
11 months
This cookie is set by GDPR Cookie Consent plugin. The cookie is used to store the user consent for the cookies in the category "Analytics".
cookielawinfo-checkbox-functional
11 months
The cookie is set by GDPR cookie consent to record the user consent for the cookies in the category "Functional".
cookielawinfo-checkbox-necessary
11 months
This cookie is set by GDPR Cookie Consent plugin. The cookies is used to store the user consent for the cookies in the category "Necessary".
cookielawinfo-checkbox-others
11 months
This cookie is set by GDPR Cookie Consent plugin. The cookie is used to store the user consent for the cookies in the category "Other.
cookielawinfo-checkbox-performance
11 months
This cookie is set by GDPR Cookie Consent plugin. The cookie is used to store the user consent for the cookies in the category "Performance".
viewed_cookie_policy
11 months
The cookie is set by the GDPR Cookie Consent plugin and is used to store whether or not user has consented to the use of cookies. It does not store any personal data.
Functional cookies help to perform certain functionalities like sharing the content of the website on social media platforms, collect feedbacks, and other third-party features.
Performance cookies are used to understand and analyze the key performance indexes of the website which helps in delivering a better user experience for the visitors.
Analytical cookies are used to understand how visitors interact with the website. These cookies help provide information on metrics the number of visitors, bounce rate, traffic source, etc.
Advertisement cookies are used to provide visitors with relevant ads and marketing campaigns. These cookies track visitors across websites and collect information to provide customized ads.
Mastering Email Deliverability | Crafting Emails That Drive Action | Building Your Cold Email System | Senders Warm-Up & IP Reputation | Email Quota Calculation | Psychological Impact of Sales | Personalization & Segmentation | The Power of Storytelling | Building Credibility & Social Proof | Call to Action Strategies | From Cold to Warm Leads & Sales Pipelines | Integrating Other Channels